You may not be surprised to hear that I’ve started making my own kombucha (this post originally written in January 2025), but trust me – this is HUGE for me!
I may be holistic and all, and for sure I recognize all the amazing health benefits of kombucha, but I’m also super impatient. What can I say, I’m your typical type A.
In the last few years though, I’ve worked really hard at ‘slowing down’ in life, smelling the roses so-to-speak. So after my son brought a jar of his delicious homemade kombucha to a family dinner recently (he’s been brewing for 8 years now!), I thought Why not? Maybe now is a good time to practice patience.
Turns out it does not require much patience at all – yay!

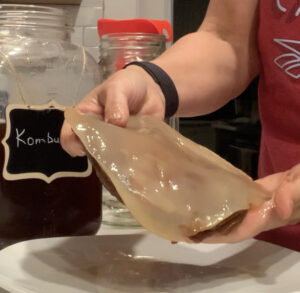
So he brought me a piece of his scoby (symbiotic culture of bacteria and yeast) – which in case you don’t know, looks like [sorry in advance for the description] a large layered mushroom top and the texture is kinda firm, but also kinda slimy and snotty.
And so I finally entered the world of making homemade kombucha.


I should mention that my son and I live in different provinces!
Yup, that’s how far I was willing to go to do this… triple seal and wrap a glass mason jar with a snotty scoby and liquid in it and fly it home in my checked bag. Like I said, all-in type A when I decide something 🧐
Without further adieu, below I answer all the questions I had (and figured you might too) about making your own homemade kombucha.
-
- About the fermentation process
- How much sugar remains in your finished kombucha?
- Can you use a sugar substitute when making kombucha?
- Directions for making kombucha
- Why black tea to make kombucha?
- Why caffeine & how much remains after fermentation?
- What happens when my scoby gets too big?
- What if I’m away for longer than 7-10 days?
Note: much of this info comes from the internet, as I’m no expert [yet].
About the Fermentation Process
Making kombucha can involve two distinct phases, although only the first one is necessary. Each phase serves a specific purpose in developing the flavor, carbonation, and overall profile of the drink.
Here’s a breakdown:
PHASE 1: PRIMARY FERMENTATION
Duration: Typically 7–10 days.
What Happens:
- In this phase, sweet tea is transformed into kombucha by the scoby.
Key Processes:
- Yeast in the scoby consumes sugars, producing ethanol (alcohol) and carbon dioxide (CO₂).
- Bacteria convert the ethanol into organic acids (acetic acid, gluconic acid), which give kombucha its tangy flavor.
Result:
- A slightly sweet, tangy drink with minimal carbonation.
- The scoby protects the kombucha from contaminants and adds probiotic bacteria to the brew.
Purpose: Develop the foundational flavor and probiotic content of kombucha.
PHASE 2: SECONDARY FERMENTATION
Duration: Typically 2–5 days (or more, depending on taste preference).
What Happens:
- After the first phase and after removing the scoby from the liquid (your kombucha), you bottle it up and seal it airtight for additional fermentation.
Key Processes:
- The residual sugars are further consumed by yeast, producing more CO₂.
- Since the bottles are sealed, the CO₂ becomes trapped, carbonating the kombucha.
- If you add flavorings (e.g., fruit, ginger, or herbs), they contribute additional sugars and enhance flavor complexity.
Result:
- A fizzy, flavorful, and more refined kombucha.
- Sugar levels decrease further, depending on how long it ferments.
Purpose: Increase carbonation, a little less remaining sugar content, and potentially added flavor customization.
NOTE: I have ever done this second phase as [type A] it seems like more work than necessary and I personally enjoy the less carbonated kombucha anyway. Plus there are still loads of microbiome health benefits in phase 1 product.

My son Dustin has three gallons on the go at any given time!
How much sugar remains in your finished kombucha?
Sugar is consumed by the microbes in your scoby. When brewing kombucha with the recommended amount of sugar (more on that shortly), the sugar content decreases significantly even just in the first phase and then a little more yet in the second phase.
SUGAR REMAINING AFTER THE FIRST PHASE (Primary Fermentation)
- Duration: ~7–10 days.
- Approximate Sugar Content: 6–10 grams per cup (8 oz).
- Factors:
- Yeast consumes sugar to produce ethanol and CO₂.
- Bacteria convert ethanol to organic acids.
- A shorter fermentation (~7 days) leaves more sugar, while a longer one (~10 days) reduces it further.
SUGAR REMAINING AFTER THE SECOND PHASE (Secondary Fermentation)
- Duration: another 2–5 days in sealed bottles.
- Approximate Sugar Content: 2–6 grams per cup (8 oz).
- Factors:
- Remaining sugar from primary fermentation continues to be consumed.
- Adding flavorings (like fruit or juice) during secondary fermentation may temporarily increase sugar content, but the fermentation process reduces it again.
Can you use a sugar substitute when making kombucha?
Using a clean pot, bring 1 gallon (16 cups) of filtered water with 8 caffeinated black tea bags to a boil. Hard boil for 10-20 minutes. Remove from heat, remove the tea bags, and stir to dissolve one and a third cup (1 + 1/3 cup) of white sugar in it. Then leave and let it cool to room temperature, either in or out of the fridge. IMPORTANT: once the sugar is in, make sure to keep your pot security covered with a lid to prevent fruit flies from getting in and contaminating.
Alternative amount: use 3 litre of water + 6 tea bags + 1 cup sugar
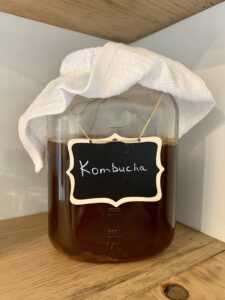
Once the sugar water is cooled to room temperature, slowly pour it the liquid over the scoby into the brewing jar. Cover it with a cotton cloth (tea towel works well) and use an elastic to seal around the lid. The cotton is so it can breath and the elastic is to keep fruit flies out.
Put aside in a stable location, away from direct sunlight, where it can ferment undisturbed for 7-10 days. Voila!
.
AFTER 7 DAYS – IT’S READY!
.
Repeat the boiling water, tea bags, sugar and cooling process as above.
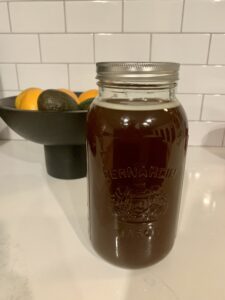
Just when it’s cooled and ready to transfer into the brewing jar for the new batch, gently lift the scoby from the brewing jar and place on a clean plate (rinsed with vinegar). Pour your batch of kombucha out of the brewing jar into clean glass mason jars – it’s that easy!
It’s now ready to drink and you can flavor it further if you like. I like to add my favorite decaffeinated herbal tea at this time – Bengal Spice or a lemon ginger flavor (keep reading for more info on caffeine and kombucha).
IMPORTANT: leave about 1/2 to 1 inch of the liquid in the brewing jar with the scoby.
Then proceed with gently pouring the new tea and sugar water over the scoby into the brewing jar. Cover, elastic, and wait 7 days. Repeat, enjoy, etc.
There you go – now you know how to make homemade kombucha!
.
Slippery little sucker!
.
OTHER QUESTIONS YOU MIGHT HAVE…
.
WHY BLACK TEA TO MAKE KOMBUCHA?
Black tea is one of the most commonly used types of tea for making kombucha because it provides the ideal nutrients for the scoby while supporting a balanced flavor. It’s rich in nutrients like polyphenols (antioxidants) and nitrogen compounds that feed the bacteria and yeast in the scoby, ensuring a healthy fermentation process. It also provides consistent, predictable fermentation results, making it ideal for beginners. Lastly, unlike herbal teas, black tea contains no oils or additives that might disrupt the scoby.
There are some other teas you can use though.
- Green Tea: milder flavor and lighter taste, rich in antioxidants and nutrients similar to black tea. Might produces a gentler flavor and may ferment slightly faster.
- White Tea: subtle and floral, with a delicate flavor; less processed than black tea, so it retains more antioxidants, may result in a lighter-tasting kombucha.
- Oolong Tea: a balance between black and green tea in flavor and nutrients.
- Herbal Teas (e.g., chamomile, rooibos, hibiscus): Chat gpt says that you can add herbal tea in combination to your black tea, but I’ve never tried this and I’d worry about the caffeine levels or other possible ingredients that may not be good for your scoby.
WHY CAFFEINE & How much remains after fermentation?
Kombucha requires caffeinated teas like black, green, white, or oolong for fermentation. The caffeine feeds the scoby, though the final kombucha contains less caffeine than the tea itself due to fermentation.
After 7 days of fermentation, your kombucha will likely contain 14–25 mg of caffeine per cup (8 oz). For comparison: A typical cup of brewed black tea has 40–70 mg, so kombucha contains significantly less caffeine. Longer fermentation (e.g., 10–14 days) reduces caffeine slightly more. Also, a healthy, active scoby will metabolize (used up) caffeine more effectively.
.
WHAT HAPPENS WHEN MY SCOBY GETS TOO BIG?
Optimal scoby size is about the diameter of your brewing jar. Most commonly used is a one-gallon jar and in this case, a 7-8 inch diameter and 0.5-1.5 inch thick scoby is ideal. Even if your starter scoby is less than the diameter of your brewing jar, that’s okay – your scoby will grow in it.
WHY keep the size maintained?
- A large scoby can over-ferment your kombucha, making it overly tart.
- An oversized scoby can crowd your container, leaving less room for the tea.
- Trimming helps prevent the scoby from becoming too dense or developing dead layers.
What to do with excess scoby when it grows too big?
.
- Trim it:
- Use clean hands to gently peel or separate off the layers. You’ll often find they naturally come apart without much effort. If not, use clean scissors or a knife to cut a piece. You can discard or repurpose them.
- Peel off layers from the bottom to trim or share, as the newest growth occurs at the top, forming fresh, healthy layers.
- Start a scoby hotel:
- Store excess scobys in a jar with sweet tea to keep them healthy for future use (I’ve never done this, so if you do, let me know how it goes).
- Share or compost:
- Share with friends or add to your compost for garden benefits.
- A piece roughly 4–5 inches in diameter or a layer of about ½ inch thickness is a good size for sharing.
- Package for Sharing:
- Place the scoby piece in a clean glass jar.
- Add 1–2 cups of starter liquid (kombucha from the top of your current batch) to help kickstart fermentation for the recipient.
- Instructions for the recipient: share this blog post!
WHAT IF YOU’RE AWAY FOR LONGER THAN 7-10 DAYS?
Okay so this was always one of my reasons for not jumping on the kombucha band wagon sooner too.
Turns out nothing bad will happen if you’re away at all – in fact, something wonderful happens! You’ll get a super concentrated microbiome-booster liquid similar to apple cider vinegar (ACV).
WHY OVER-FERMENTED KOMBUCHA WORKS LIKE ACV
- Acetic Acid Content:
- Kombucha, when over-fermented, has high levels of acetic acid, the same compound that gives apple cider vinegar its characteristic tang and health benefits.
- Probiotic Properties:
- Like ACV, kombucha retains probiotics and organic acids that may support gut health, making it a functional substitute.
- Versatility:
- The tart, tangy flavor works well in recipes, dressings, and as a household cleaner (similar to ACV).
HOW TO STORE IT
- Transfer the over-fermented kombucha to an airtight container and refrigerate it. This slows further fermentation and preserves its flavor and acidity.
NOTE: If it has visible mold (rare), discard it entirely, as mold can indicate contamination.


Follow me on social media for more Adventures of Scoby Doo!


